
InDesign and Marq both use separate codebases so there can be some differences. We have outlined some of the most common errors and how to fix them.
Jump to a section
| Potential errors |
| Missing fonts |
| Missing images |
| Hidden layers |
| Styling and spacing |
| Text effects |
| Image effects |
| Shape effects |
| Table effects |
| Pro tips |
| Non-supported InDesign features |
Potential errors
Red triangle warning sign
The red triangle sign appears next to an object that is missing information. If you click the red triangle when your font is missing, you will see two options. "Keep Default Font" means that your text will be formatted in the Marq default font, typically Open Sans, rather than your custom font. "Find Missing Font" will reopen the dialog where you can upload the missing font file.
Red plus symbol
InDesign has different spacing parameters than Marq. Like most online software programs, Marq counts line spacing in sections of 3, while InDesign counts in sections of 5. Because spacing is different, if there is not enough room in the text box for the new line spacing, Marq will condense the text into a red plus box. Go through these steps and then click the button below to practice making adjustments!
Expand text box If the text box does not expand completely, select one of the corners of the object and expand it out until the red (+) disappears. You may see a pop-up that says "Auto resize failed..." In this case, expand the text box length and height.
Missing fonts
Option 1: Find a different version of your font online
Some fonts are available in different formats for free online. Try searching on Google for "[FONT NAME] free". Then, import the new download of the font. You may want to try two or three different sites to see if you can get the font to match in Marq.
Select the font dropdown in the right context pane. Under "Custom Fonts", select "Manage Fonts". Within the font manager, you can upload any OTF or TTF font file.
Option 2: Upload your font manually and replace your text
If you uploaded one of the fonts from your InDesign packaged folder and you're certain that: (1) it's an OTF/TTF file type and (2) it's the exact font you need, then upload that font to Marq anyway. Even though it may not match during the import, you can still upload the font inside the editor and manually change the text to that uploaded font.
-
Once the font is uploaded, you can manually adjust the text within the Project. Select multiple text boxes at once by holding down Ctrl on PC (or Cmd on Mac). Then, pick your font from the font dropdown.
-
It can be helpful to open the PDF found in the InDesign package as a comparison. Flip back and forth to closely match the formatting.
PRO TIP: If this project will be used as a template, make sure all the fonts are uploaded in the "Team Fonts" section rather than the "Custom Fonts" section inside the editor. This will make the font available for everyone on your team.
If you're really tech-savvy and for some reason have text-editing software like Robofont, you can edit the metadata of the font. You may want to test adjusting multiple fields. Rename the font name, weight name, full name, PC name, Mac name, and a few others. Every field can influence how the file imported, so this option can be challenging. It can work, but this method generally takes longer than the second option: manually changing the font.
If, for example, you used an Adobe Typekit font on your InDesign Project and you don't want to pay to purchase the font as an OTF/TTF, we recommend searching for a font substitute. You can search the Marq font library or look online. Most of the time, you can find a free font that looks very similar to the one you used before.
Once you find a substitute font, you have two options: 1) Upload the new font to Marq and manually change the text to the new font. 2) Change the font in your original InDesign file and re-import the file to Marq.
Marq also has a variety of free fonts, so check to see if Marq already has a font substitute you can use!
Missing images
Remember: Marq supports PNG and JPEG images. It can sometimes import other file types like PSP or PDF by compressing and converting to a JPEG. If you were unable to upload your image, this section will help you fix the image error.
Click the red triangle to find the missing image or replace it.
In the case of replacing EPS/PSP images with your newly converted PNG/JPEG images, you have three options: 1) You can click "Replace Missing Image". 2) You can simply drag your new image from your desktop over the missing image. 3) You can double click the missing image to upload the new image to your Image Manager.
You can practice by downloading this file
Hidden layers
Every layer in InDesign (even hidden layers) will be imported with your Project, and sometimes, the order of the layers can be off. You can remove any layers that you don't need in Marq or you can bring objects to the front.
To change the order of an object, navigate to "Arrange" under the "Layout" tab or right-click on an object and select "Arrange."
PRO TIP: You may consider deleting any hidden layers in InDesign before importing for a smoother import.
How to ungroup a group of layers
Layers grouped in InDesign will also be grouped in Marq. It is easier to edit objects if they are not grouped. To ungroup a set of objects, right-click and select "Ungroup."
Styling and Spacing
InDesign measures line spacing differently than mainstream tools like Microsoft Word or Apple Pages. Instead of three lines, InDesign has five--which makes it different than any other platform. Most likely, you'll need to adjust some spacing.
Paragraph Styles
Generally, Marq can import paragraph styles from InDesign the exception is if your paragraph style is “based on” another style. A good indicator that your style wasn’t imported is if the font was converted to Adobe’s default font Minion Pro.
To check your paragraph style in InDesign, find your paragraph style and click the pencil icon. Under the “General” tab, check to see if your style is “based on” another style. If it is, then it will not import to Marq.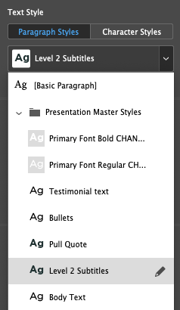

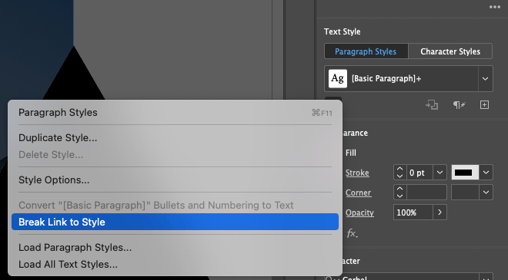
Workaround: Strip the paragraph style in InDesign. Highlight the text and click the paragraph style button for more options. Then, click “Break Link to Style”.
Line Spacing
The spacing option increases or decreases the space between lines. This is frequently used with InDesign Import.
Paragraph Spacing
Paragraph spacing increases or decreases the space between paragraphs rather than individual lines.
Character Spacing
Character spacing will move letters closer together or farther apart.
Stretching
Character stretching will horizontally stretch or compress the letters.
Bullet Indents
If you have bullets, bullet indent will increase or decrease the distance of the bullet from the margin.
First Line
Adjust the first line to create a hanging indent. If you have bullets, you can adjust the first line or the left tab to make your text aligned.
Text effects
Overflow Text into another box
If you have text boxes linked in InDesign, where any overflow of text automatically continues in another text box, they should transfer over to Marq. To link a text box, click the blue triangle on the bottom corner of a text box and drag it to any area within the other text box. You'll see a blue line connecting the two boxes, indicating that they are now linked.
Wrapping Text
To wrap text around your image, select the image and adjust the "Text Wrapping" settings in the "Layout" tab.
Drop Caps
Drop caps will not import to Marq. To make a drop cap in Marq, create a separate text box for the larger letter in "Body Text" format. Format your letter and add text wrapping under the "Layout" tab on the right. Adjust the text wrapping padding as needed.
Text on a path
If you have text on a path (for example, text going around a star shape), it will not import to Marq. Marq has some path effects, but they are limited. These settings can be found on the right pane under the "Text" tab in the warp settings.
Images effects
Images might come in differently when imported from InDesign.
Image Rotation
Images may import with a different rotation. To rotate an image, select an image and hover over the white dot at the top until your cursor becomes a circular arrow. Click and hold as you turn the shape. TIP: if you hold SHIFT while rotating, your object will lock in place at the 90 and 45-degree marks.
Flip Image Orientation
If the image was flipped horizontally in InDesign, it will not look the same when imported to Marq. To flip an image, start by selecting the image in Marq and navigate to the "Layout" tab on the right. Under the "Rotate" section, click the "Flip horizontally" button.
Image Borders
To add a border to your image, select the image and navigate to the "Image" tab on the right. Under "Border," you can choose the color, style, or pixel size of your border.
Round out images
You can also use borders to change the corners of your image. To round out the corners increase the radius.
Add a Shadow
You can add a shadow to your image under "Shadow" in the "Image" tab on the right. Note: you may need to turn the shadow on to access the other shadow settings.
Image filters/coloring
If your image had a black-and-white filter in InDesign, you can adjust the saturation in Marq for a similar effect. Select the image and select the image fill under the "Image tab" on the right. Click the "Effects" button to access saturation.
Opacity
To apply an overlay, you can lower the opacity of an image. Select your image and find the opacity section under the "Image" tab on the right.
Shape effects
Custom Shapes
If your InDesign file used a standard shape that skewed the lines, your shape may have reverted back to the standard shape. For example, let's say you created a rectangle and adjusted the ends to be curved inward (see below).
To import this custom shape, the best way is to add it as a PNG to your Marq project. Start by opening your InDesign file, selecting the shape, and clicking File--->Export. Make sure you are exporting the selection rather than the whole page. You will now have a PNG file of your shape to upload to your image manager in Marq.
Change Colors
If your shape is a different color, select the shape and navigate to the right panel. Edit the fill option to be the appropriate color
Adjust Transparency
To adjust the transparency of a shape (or any object), navigate to the fill option under the "Shape" or "Image" tab. You can adjust the opacity here or under the "Opacity" section.
Corner Appearance
InDesign offers advanced corner appearance settings for shapes. If these do not import correctly to Marq, you can add an outline to your shape using the "Border" settings. Adjust the pixel size, color, and style.
Gradients
Marq can import gradients from InDesign if you use the Gradient Tool rather than the Gradient Feather effect.
Tool:
![]()
Effect:
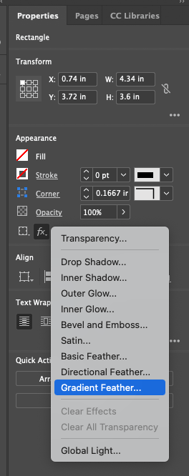
Also, you can manually add the gradient in Marq by going to the fill color and changing it to a gradient:

Table effects and formatting
To edit the fill, select the desired cells by holding down Ctrl (or Cmd on a Mac) and clicking each one. On the right, navigate to the "Table" section to edit the fill color and opacity.
Borders
Often, your table borders will appear differently than they do in InDesign. Select the desired cells by holding down Ctrl (or Cmd on a Mac) and clicking each one. If you would like to select a full row or column, hover to the left of the row or just above the column until your cursor turns into a white arrow then click to make your selection. Navigate to the "Border" section under the "Table" tab.
To make edits, start by selecting the type of cell border you are trying to edit, then make adjustments to the pixel size, line type, or color. For example, if you want to get rid of all the border lines, you would select the icon with all lines visible and decrease the border pixel (px) size to 0.
Text Positioning
To edit the positioning of the text within a cell, select the desired cells by holding down Ctrl (or Cmd on a Mac) and clicking each one. If you would like to select a full row or column, hover to the left of the row or just above the column until your cursor turns into a white arrow then click to make your selection. Under the "Fonts" section, you can align the text to the left, center, right, or justified. You can also set the text to the top, middle, or bottom of the cell.
Pro Tips
Compare your project with a PDF
When using InDesign Import, it can be helpful to open the PDF found in your InDesign package file to see what your original file looks like. Flip back and forth between your PDF and Marq project to compare formatting while making adjustments.
SVG images
Smooth Vector Graphics (SVG) Images should be used sparingly. SVG files are rendered as a group of separate shapes. If you have too many, they will slow your project performance. SVGs are also not saved in the Image Manager because this file is actually a group of shapes, not an image. It’s best to convert any SVG files to PNGs.
Complex backgrounds
If you have a complex background, series of shapes, or unique formatting, you may want to consider exporting these elements in InDesign as a single image and uploading that image to Marq. Although you won't be able to edit the individual shapes in Marq, you will be able to import your project faster while keeping the design exactly as the original.
- Export shapes as an image
In InDesign, select any shapes/images/text you want to be included as an image in Marq. In this case, I'll select all of the bubbles. Go to "Export," make sure the format is PNG, check "Selection," and click "Export" to save. - Add as a PNG
To edit the positioning of the text within a cell, select the desired cells by holding down Ctrl (or Cmd on a Mac) and clicking each one. If you would like to select a full row or column, hover to the left of the row or just above the column until your cursor turns into a white arrow then click to make your selection. Under the "Fonts" section, you can align the text to the left, center, right, or justified. You can also set the text to the top, middle, or bottom of the cell.
Non-supported InDesign features
There are some InDesign features that Marq does not support, i.e. a table spanning multiple pages. You may need to turn off certain characteristics before importing. If you have any questions, please contact support@Marq.com.
- Adobe TypeKit Fonts
What is it? - Anchored objects
Anchored objects are not supported in Marq. You can do similar things like add text wrapping to the object or lock the object to the page. You can also group the object with other objects to keep it in the same relative position, but Marq does not have an anchoring feature. - Animations
What is it? - Balanced Headline Text
What is it? - Baseline Shift
What is it? - Bookmarks
What is it? - Cell Styles
InDesign allows you to save cell styles to apply to other cells. This feature is not supported in Marq. - Clipping Paths
Clipping paths are not supported in Marq. To preserve the formatting of your clipping paths, export the object as a PNG and add it to Marq.
What is it? - Data Merge
A data merge in InDesign may not import correctly to Marq. In the future, Marq will release a data merging feature called External Data Import.
What is it? - Editoral Notes
Editorial notes will not transfer to Marq. You can add a note to a specific object by clicking the comment button on the bottom right of the editor. Just know that these comments will not appear when you download or publish the project.
What is it? - Endnotes
What is it? - Export as EPUB
What is it? - Export as HTML (limited)
You can export your project with HTML code by clicking the blue "Share" button. Publish your to the web and then click "On your website" or "In email" to generate the HTML code. Note: this will display only the first page of yourproject . The first page will become a button that links to the published URL.
What is it? - Export as XML
What is it? - Export as XML
Footnotes will not transfer over to Marq. There is no automation to create footnotes. You can make a subscript for your text, but it will not automatically create a text box for your footnote. Make a new text box to add your footnote. What is it? - Form Fields
What is it? - Glyphs
These will not transfer to Marq. Find the special character by navigating to the top menu and selecting Insert-->Special Character. You can also copy and paste special characters from an external source.
PRO TIP: Use Ctrl+Shift+V (or Cmd+Shift+V) to paste and match the existing formatting.
What is it? - Hyperlinks
Hyperlinks do not transfer over to Marq. To add your hyperlinks in Marq, select the object and go to the right panel. When you are finished entering the URL, hit "Enter/Return" on the keyboard to save your link. - Image Captions
Image captions are not supported. Make a separate text box in Marq as your caption.
What is it? - Index
A page index will not transfer over to Marq. To make an index in Marq, you can manually add the page numbers.
What is it? - Kerning
Make adjustments to the spacing under the "Text" tab on the right.
What is it? - Ligatures
What is it? - Lines with endpoints
Marq does not support lines with endpoints. A line with an arrow at the end is an example of this. Like custom shapes, you can export the arrow from InDesign as a PNG, or you can add an arrow shape from the Marq shape library. - Master Pages
Master pages from InDesign will not import correctly to Marq. See the other sections to fix any differences you see. Marq does not have "master pages", but you can create page templates that can be used in the same project. These page templates will not transfer to other project (unless you manually copy and paste the page from one project to another).
What is it? - Plugins
What is it? - Shape Styles
InDesign allows you to save shape styles to apply to other shapes. This feature is not supported in Marq. You can, however, copy and paste an existing shape to preserve the same formatting. - Strikethrough Options
What is it? - Split Columns Paragraph split columns are not supported in Marq, so these will likely import incorrectly. You can recreate a similar look in Marq by making a separate text box for the paragraph split.
- Table filled with an image
If you have a background image filled in a table, it will not transfer to Marq. Add the image separately. Edit the fill of the table to be transparent and put the image behind the table. - Table Styles
InDesign allows you to save table styles to apply to other tables. This feature is not supported in Marq. You can, however, copy and paste an existing table to preserve the same formatting. - Text on a path
This is not supported in Marq. Export the filled text from InDesign as a PNG and insert it to your Marq project.
What is it? - Text variables
This is not supported in Marq. Export the filled text from InDesign as a PNG and insert it into your Marq .
What is it? - Videos
Videos are not supported in Marq. You can add a video from YouTube or Vimeo, but the video itself will not upload to Marq. Instead, it will embed the video player from YouTube or Vimeo.
What is it?
Supported font types
Marq supports OTF (OpenType Font) and TTF (TrueType Font) formats. Adobe Typekit files are not supported.