
Jump to a section
Preparing and hosting DAM data
Learn how to transform DAM data prior to integration.
Note: In order to connect to a DAM, the integration must be enabled in your account. Reach out to your CSM for connection instructions.
Overview
Accounts using the Marq DAM API must transform their DAM data prior to integration. The DAM data must conform to the Marq JSON format (see below). Once the transform is complete, accounts must host the corresponding JSON file on a server and generate a public URL to access that file. Any future changes to the DAM should be reflected in the JSON file, which the API will reference daily to update the images, folders, and tags that appear within Marq.
JSON Schema
{
version: number,

data: folder[]
}

image: {
id: string,
name: string,
tags: string[],
url: string,
thumbnailUrl: string
}

folder: {
id: string,
name: string,
folders: folder[],
images: image[]
}
Sample JSON
{
	"version": 1,
	"data": [{
		"id": "100",
		"name": "Marq Logos",
		"folders": [{
			"id": "102",
			"name": "Marq",
			"folders": [],
			"images": [{
				"id": "200",
				"name": "Marq Logo",
				"tags": ["logo", "press", "Marq"],
				"url": "app.marq.com/press.jpeg",
				"thumbnailUrl": "app.marq.com/pressThumbnail.jpeg"
			}, {
				"id": "201",
				"name": "Wide Marq Logo",
				"tags": ["logo", "press", "Marq", "wide"],
				"url": "app.marq.com/pressWide.png",
				"thumbnailUrl": "app.marq.com/pressWideThumbnail.png"
			}]
		}, {
			"id": "103",
			"name": "Marq",
			"folders": [],
			"images": [{
				"id": "202",
				"name": "Marq Logo",
				"tags": ["logo", "press", "Marq"],
				"url": "app.marq.com/press.jpeg",
				"thumbnailUrl": "app.marq.com/chartThumbnail.jpeg"
			}]
		}],
		"images": [{
			"id": "203",
			"name": "Marq L",
			"tags": [],
			"url": "www.golucid.co/lucidL.png",
			"thumbnailUrl": "www.golucid.co/lucidLThumbnail.png"
		}]
	}, {
		"id": "101",
		"name": "Other",
		"folders": [],
		"images": []
	}]
}
Technical requirements
The DAM API uses image dimensions—among other information—to check for deleted images that have been reuploaded for the purpose of restoring those images in their respective documents. The API collects this information by sending HEAD requests to the server hosting the DAM images. Accordingly, in order for restore functionality to work, the server hosting the DAM images must permit HEAD requests on all image resources.
Connecting your DAM
Learn how to connect a DAM to your Marq account.
How to connect your DAM
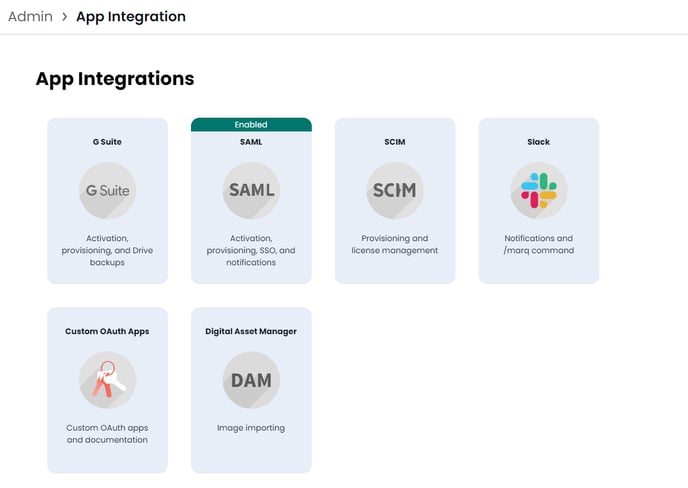
Once you’ve transformed your DAM data, produced an associated JSON file, and generated a URL to access that file, connecting a DAM to your account is as simple as adding the associated URL to the DAM integrations page. To start, navigate to the admin panel by selecting the Team tab in the Marq homepage. Then click App Integration > Digital Asset Manager.
On the DAM integration page, select Add DAM.
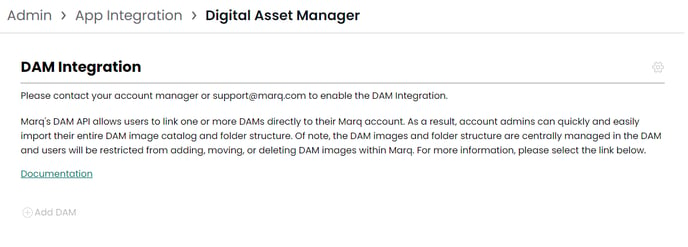
After you select Add DAM, a tile will appear that contains two text fields: (1) DAM Name and (2) JSON URL. For the DAM name, enter whichever name you’d like to appear as the top-level folder in the DAM folder tree. This could be the name of the DAM itself or it could describe the content within the DAM (e.g., “Stock Photos”). Of note, this name will appear as the top-level DAM folder for all users on the account.
Next, add the URL to access the JSON file within the JSON URL field.
Once you’ve completed these steps, click Save. Assuming the JSON file matches the API schema, the API will begin processing the file and syncing the DAM.
Although sync time largely depends on the number of images in the DAM, the sync should generally take no longer than five minutes.
How to push DAM updates to Marq
Once the initial sync is complete, the API will automatically resync the DAM every 24 hours. Upon syncing, any changes made to the DAM during the period between syncs will be reflected within Marq.
If desired, you can also manually sync your DAM. Use this feature if you’d like to push DAM changes to Marq sooner than would occur with the daily sync. To manually sync a DAM, navigate to the admin panel by selecting the Team tab in the Marq homepage. Then click App Integration > Digital Asset Manager.
If desired, you can also manually sync your DAM. Use this feature if you’d like to push DAM changes to Marq sooner than would occur with the daily sync. To manually sync a DAM, navigate to the admin panel by selecting the Team tab in the Marq homepage. Then click App Integration > Digital Asset Manager.
On the DAM integration page, click the gear icon in the top-right corner and select Manual Sync. Of note, manually syncing a DAM will not disrupt or reset the automatic syncing schedule.
How to remove DAM from your Marq account
Deleting a DAM will permanently remove the DAM and its associated data from your team’s account. All images used from the DAM will be removed from their respective documents and replaced with a placeholder image. To remove a DAM from your account, navigate to the admin panel by selecting the Team tab in the Marq homepage. Then click App Integration > Digital Asset Manager.
Next, hover over the DAM tile you’d like to delete. Select the pencil icon that appears to the far-right of the tile.
Once the DAM tile is expanded, select the trash icon in the top-right corner. A confirmation dialog will appear. Review the message within the dialog, and then select “Delete” to remove the DAM from your account.
Using DAM images
Learn how users will access and use DAM images within Marq.
How DAM images appear in your image manager
Each DAM connected to your account will appear as a separate folder tree within every user’s Image Manager. The name of the top-level folder in the DAM folder tree will be whichever name you specified when you initially connected the DAM.
To change the name of the top-level folder in the DAM folder tree, simply return to the DAM integration page in the admin panel and edit the name within the relevant DAM tile.
How to use DAM images within documents
DAM images use the same drag-and-drop functionality as all other images in Marq. To use a DAM image, navigate to the Images tab in the content pane in the editor. In the dropdown menu, select your DAM. Images will then populate within the content pane. Simply drag images directly from the content pane onto the canvas.
Alternatively, you can access DAM images from the Image Manager. To access the Image Manager, navigate to the Images tab in the content pane and select the Manage button in the top-right corner of the pane.
Alternatively, you can access DAM images from the Image Manager. To access the Image Manager, navigate to the Images tab in the content pane and select the Manage button in the top-right corner of the pane.
Once you’ve opened the Image Manager, navigate to the DAM folder tree . You can insert images by double-clicking an image or by single-clicking a image and selecting Insert.
How to use tags to find DAM images
DAM images use the same tag functionality as personal images in Marq. To use tags to search for assets, navigate to the relevant DAM folder in the Images tab in the homepage or the Image Manager in the editor. Next, select the Tags dropdown and click one or more tags in order to filter DAM assets.
Tracking and replacing deleted images
Learn how to identify which documents and templates contained deleted images.
Overview
Any changes to the DAM in terms of folder structure, image content, and tags will be reflected in Marq following the proceeding sync. This means that any images deleted from the DAM will be removed from their respective documents and replaced with a placeholder image. The API tracks and automatically displays all documents and templates that contained now-deleted DAM images. This lets you quickly identify and fix any documents and templates affected by deleted images.
How to find documents that contained a now-deleted image block
Marq will display a unique icon on any documents or personal templates that contained an image that has since been deleted from the DAM. Users can update the images within the affected documents, ignore the notification, or return to the original brand template and create a new document (assuming the image has been updated in the Brand Template).
How to find Brand Templates that contained a now-deleted image block
Marq will show a distinct Update Templates page in the Templates tab that displays a list view of all Brand Templates that are missing images. This page appears only if there are Brand Templates that are missing images, and it is visible to the account owner and template admins only.
In addition to the Update Templates page, Marq will show an updated header on all Brand Templates that are missing images. These headers are visible to the account owner and template admins only.
Marq will also send an email notifying the account owner and template admins any time Brand Templates are affected by new deletions from the DAM. This email will redirect admins to the Update Templates page within the Templates tab.
How to replace a deleted image
Replacing a deleted image and resolving a document or template is as simple as adding a new image to the associated placeholder block. These placeholder blocks appear as “gray mountains” within a document. Adding new images to all placeholder blocks will remove the associated document or template from the list of documents that are missing images.
Restoring deleted images
Overview
All images deleted from the DAM will be removed from their respective documents and replaced with a placeholder image. This functionality lets accounts maintain centralized control in the DAM; however, it means that mistakes and accidental deletions from the DAM can directly impact your documents in Marq. For this reason, the API provides built-in image restore functionality to help accounts quickly fix errors.
How to restore a deleted image within documents and templates
To restore a deleted image within its respective documents and templates in Marq, simply reupload the deleted image to the DAM. Upon syncing, the API will use the image content to determine whether that image was used in any documents or templates that contain a placeholder block. If it finds associated placeholder blocks, it will restore the image. Of note, restore functionality will not work if you add new images to the placeholder blocks associated with the deleted image.
Technical requirements
The DAM API uses image dimensions—among other information—to check for deleted images that have been re-uploaded for the purpose of restoring those images in their respective documents. The API collects this information by sending HEAD requests to the server hosting the DAM images. Accordingly, in order for restore functionality to work, the server hosting the DAM images must permit HEAD requests on all image resources.
Additional features
Learn more about error detection, authentication, and manual syncing.
Error detection
Any changes to the DAM in terms of folder structure, image content, and tags will be reflected in Marq following the proceeding sync. This means that any images deleted from the DAM will be removed from their respective documents and replaced with a placeholder image. Due to the potential impact of this operation, the API provides built-in error detection that stops a sync if we detect a significant change in the number of images in your DAM.
Specifically, if the API detects a change of 10% of greater between syncs, it will pause automatic syncing and send a notification to the account owner and all data admins. This percentage is based on total images in the DAM and measures only deleted images (i.e., images detected in the previous sync that no longer appear in the JSON file). An admin must then review and approve the detected deletions and ensure they are accurate and intentional. Upon approving changes, the API will resume automatic syncing.
Specifically, if the API detects a change of 10% of greater between syncs, it will pause automatic syncing and send a notification to the account owner and all data admins. This percentage is based on total images in the DAM and measures only deleted images (i.e., images detected in the previous sync that no longer appear in the JSON file). An admin must then review and approve the detected deletions and ensure they are accurate and intentional. Upon approving changes, the API will resume automatic syncing.
Authentication
While the API relies on public URLs to pull images from the DAM, accounts have the option to add basic authentication. Specifically, your server can request authorization to access the JSON file, and the API will provide the required username and password. Please contact your Marq customer success representative for more information on how to set up basic authentication for your DAM.
Manual Syncing
If desired, you can manually sync your DAM. Use this feature if you’d like to push DAM changes to Marq sooner than would occur with the daily sync. To manually sync a DAM, navigate to the admin panel by selecting the Team tab in the Marq homepage. Then click App Integration > Digital Asset Manager.
On the DAM integration page, click the gear icon in the top-right corner and select Manual Sync. Of note, manually syncing a DAM will not disrupt or reset the automatic syncing schedule.
FAQ
Can I upload images to the DAM within Marq
No. All users will be restricted from adding, moving, or deleting DAM images, folders, and tags within Marq. These restrictions help accounts maintain centralized control within the DAM.
What happens to images that have been deleted from the DAM?
Any changes to the DAM in terms of folder structure, image content, and tags will be reflected in Marq following the proceeding sync. This means that any images deleted from the DAM will be removed from their respective documents and replaced with a placeholder image.
How will I know which documents contained images that have been deleted from the DAM?
For documents and personal templates, Marq will display a unique icon on any documents that contained an image that has since been deleted from the DAM. Users can update the images within the affected documents, ignore the notification, or return to the original brand template and create a new document (assuming the image has been updated in the Brand Template).
For Brand Templates, Marq will show a distinct Update Templates page in the Templates tab that displays a list view of all Brand Templates that are missing images. This page appears only if there are Brand Templates that are missing images, and it is visible to the account owner and template admins only. Marq will also send an email notifying the account owner and template admins any time Brand Templates are affected by new deletions from the DAM.
In addition to the Update Templates page, Marq will show an updated header for any Brand Templates that are missing images. These headers are visible to the account owner and template admins only.
Can I connect multiple DAMs to my Marq account?
Yes! Many Marq accounts use multiple DAMs to store different types and categories of assets. Business-level accounts that have purchased the DAM integration add-on can integrate as many DAMs as they’d like. Each DAM will appear as a separate folder tree within each user’s Image Manager.
What if my DAM uses tags and faceted search rather than a file structure to organize assets?
Marq will import all image tags provided in the DAM JSON file. You can use these tags to search for assets the same way you would in your DAM. Although the JSON schema asks for folders, these fields can be left blank.
What happens if I delete a DAM?
Deleting a DAM will permanently remove the DAM and its associated data from your team’s account. All images used from the DAM will be removed from their respective documents and replaced with a placeholder image.
How long will it take to sync my DAM?
Although sync time largely depends on the number of images in the DAM, the sync should generally take no longer than five minutes.